To create a Buyer's Push
- Navigate to the Buyer's Push page in Departments - LS Retail - Replenishment - Manual.
- Open an existing Buyer's Push, or create a new one.
- If you create a new one:
- On the Home action menu, click New.
- Fill in the Code and Description fields.
The Code field is populated from the number series set up in the Replenishment Setup, the Buyer's Push No. series field.
Fill in the fields in the General FastTab as describes in the following table:
Field Description Warehouse Location Code This field specifies the source location for the Buyer's Push. The items will be taken from that location - usually this is a warehouse location. Default % to Distribute This field defines the percentage of the quantity on stock for the affected item(s) that should be used for the Buyer's Push. When filling in lines in the Buyer's Push Lines FastTab, the field Distribution % is defaulted with the value in this field. Allocation Rule Code This field defines how the affected quantity of the item(s) to distribute is assigned to the destination locations. The Allocation Rule lets you set up weights on Stores and Store Groups to define how many items and variants the store will receive. For more information see Allocation Rule. Buyer ID This field specifies the Buyer ID for this Buyer's Push. This is used in the Buyer's Workbench to filter documents for buyers or buyer groups. Buyer Group This field specifies the Buyer Group for this Buyer's Push. This is used in the Buyer's Workbench to filter documents for buyers or buyer groups.
- Fill in the fields in the Buyer's Push Lines FastTab.
This can be done manually or with assistance from the system.
To add items to the lines manually
You can enter items to the worksheet manually by creating new lines in the Buyer's Push Lines FastTab.
If the item uses a Variant Framework, you must fill in the field Variant Dimension 1 Code.
When a new line is created, the fields Maximum Qty. to Distribute, Distribution %, Qty. to Distribute, and Qty. Distributed are populated automatically.
Fields in the Buyer's Push Lines FastTab:
| Field | Description |
|---|---|
| Item No. | This field is the Item No. |
| Variant Dimension 1 Code | This field is only filled for items with a Variant Framework. If the lines were calculated by the Add Item Lines action, a separate line would be created for every Variant Dimension 1 Code. |
| Item Description | This field shows the description of the item |
| Allocation Role Code | This field is the currently active Allocation Rule that is applied for this line. The Allocation Rule Code is inherited from the Allocation Rule Code in the General FastTab. If the item has an Allocation Rule set up in the Item Category or Product Group, this values will be considered. You can change the Allocation Rule in the Buyer's Push Line. |
| No. of Groups |
This field shows the number of Store Groups or Franchise Groups which are used to distribute the quantity. |
| No. of Destinations | This field shows the number of Locations or Customers (if Franchise Groups are used) which are used to distribute the quantity. This is applied from the selected Allocation Rule. |
| No. of Dimensions | This field shows the number of Dimensions (for the Variant Dimension 1) which are used to distribute the quantity. This field is only used for items with an Variant Framework. This is accessed from the item's Variant Framework and the Dimension Share%. |
| Maximum Qty. to Distribute | This field shows the inventory on stock for the item in the location that is set up in the field Warehouse Location Code on the General FastTab. |
| Minimum Quantity | This field limits the quantity for the destination lines. |
| Maximum Quantity | This field limits the quantity for the destination lines. |
| Distribution % | This field is filled with the Default % to Distribute field on the General FastTab. The value of this field can be changed in the lines and it affects the Quantity to Distribute field. The value is calculated with the following formula: Distribution % = Quantity to Distribute / Maximum Qty. to Distribute (Inventory) * 100 |
| Quantity to Distribute | This field shows the quantity of items which is assigned to be distributed to the stores or customers. The value of this field can be changed in the lines and it affects the Distribution % field. It is calculated with the following formula: Quantity to Distribute = Maximum Qty. to Distribute (Inventory) * Distribution % |
| Quantity Distributed | This field shows the result of the distribution calculation, after the Allocation Rule was applied to the Quantity to Distribute. Usually, the fields Quantity to Distribute and this field are equal. Differences can occur if Maximum Quantity limits a full distribution of the Quantity to Distribute or if quantity rounding creates differences. |
| Difference | This field shows the difference between the fields Quantity to Distribute and Quantity Distributed. |
| Group 1 Quantity | This field shows the quantity distributed to the first Group. |
| Group 2 Quantity | This field shows the quantity distributed to the second Group. |
| Group <n> Quantity | This field shows the quantity distributed to the <n>-th Group. |
Note: The Group Quantity fields allow a quick access to the quantities assigned to the Destination Groups. Please note that only the first six groups are displayed as individual columns. To access more groups you can drill down in the No of. Groups field, select the right group, and drill down in the Qty field.
To add items to the worksheet with the Add Item Lines function
You can add items to the worksheet by using the following steps:
- Navigate to the Buyer's Push page in Departments - LS Retail - Replenishment - Manual.
- Open an existing Buyer's Push, or create a new one.
-
Click Add Item Lines on the Home action menu.
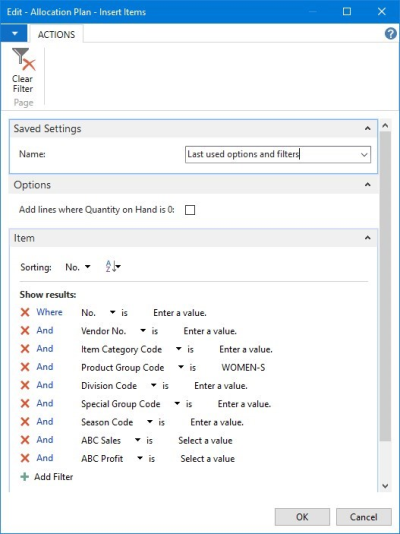
- Filter which items should be added to the worksheet.
- By deactivating the field Add line where Quantity on Hand is 0 the function does not add items to the worksheet where the available stock of the item is 0 or less in the location that you set up in the Warehouse Location Code field.
- Click OK. The system adds the items that meet the selected conditions to the worksheet.
When the calculation completes, you can see the result in a report on the Buyer's Push Lines FastTab.
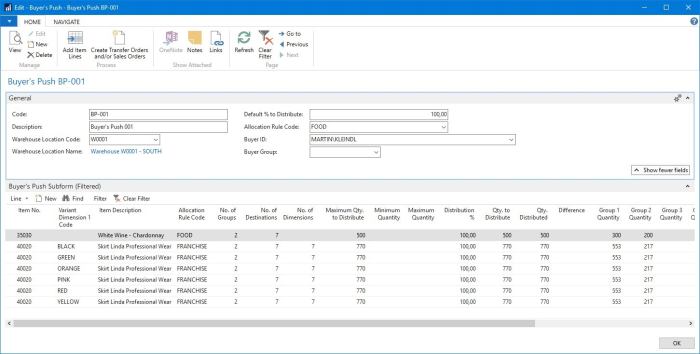
Example:

- The user has applied a Maximum Quantity of 20 for the destinations.
- In the inventory on stock (shown in the Max. Qty. to Distribute field) we have 500 pieces and 100% (the Distribution % field) should be distributed to the destinations, which is reflected in the field Qty. to Distribute.
- There are 7 Destinations in 2 Groups without any dimensions.
- The Allocation Rule assigns 20 pieces (defined in the field Maximum Quantity) to the 7 destinations resulting in a Qty. Distributed of 140.
- The user wanted to distribute 500 pieces, but only 140 could be assigned due to the Maximum Quantity; therefore, we have a difference of 360.
Note:The Group Quantity fields allow a quick access to the quantities assigned to the Destination Groups. Please note that only the first six groups are displayed as individual columns. To access more groups you can drill down in the No of. Groups field, select the right group and drill down in the Qty field.
To see the distribution result on Group Line level
-
Navigate to the Buyer's Push Lines, and click the Line menu.

-
Select Group Lines.
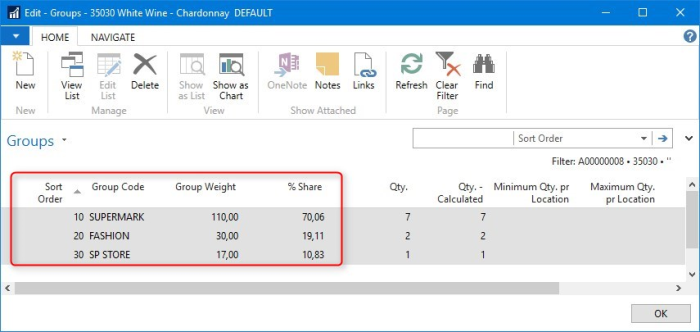
The Group Lines page shows the Store Groups which are applied to the Buyer's Push Line according to the selected Allocation Rule. You can change the Group Weight, if you want to use a different distribution share. The field % Share is calculated and represents the share of the individual Store Group line of the total - the sum of all Store Groups lines should be 100%.
The Qty. field shows the total distributed quantity for the Store Group and it is a drill-down field which opens the Location Lines page. The Location Lines represent the most detailed level in the distribution.
To see the distribution result on Destination Line level
-
Navigate to the Buyer's Push Lines, and click the Line menu.
-
Select Destination Lines.
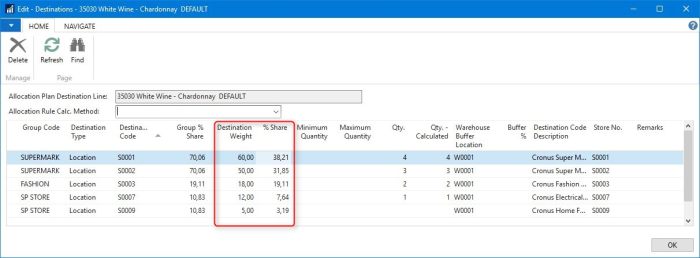
The Destination Lines page shows the locations which are applied to the Buyer's Push Line according to the selected Allocation Rule. You can change the Destination Weight, if you want to use a different distribution share. The field % Share is calculated and represents the share of the individual destination line of the total - the sum of all Store Groups lines should be 100%. This page also shows the field Group % Share which can be changed in the Group Linepage.
The field Qty. shows the total distributed quantity for the locations and it is a drill-down field which opens the Location Lines page. The Location Lines represent the most detailed level in the distribution.
Note:In the Allocation Rule Calc. Method field you can apply a different calculation method for the Destination lines. The calculation method will recalculate the Destination Weight field and update the % Share field.
To see the distribution result on Variant Line level
-
Navigate to the Buyer's Push Lines, and click the Line menu.
-
Select Variant Lines.
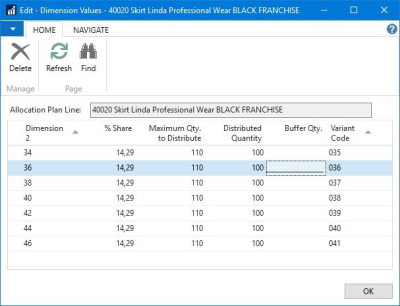
The Variant Lines page shows the variants which are applied to the Buyer's Push Line. You can change the Maximum Qty. to Distribute field, if you want to use a different distribution quantity.
The field Distributed Quantity shows the total distributed quantity for the variant and it is a drill-down field which opens the Location Lines page for the selected variant. The Location Lines represent the most detailed level in the distribution.
To see the distribution result on Location Line level
-
Navigate to the Buyer's Push Lines, and click the Line menu.
-
Select Location Lines.
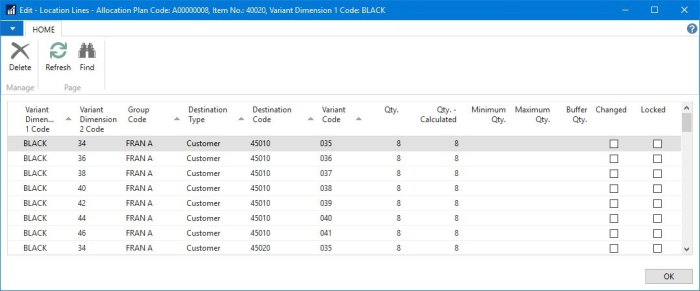
Example: Location Lines with variants and Customer as Destination Type.
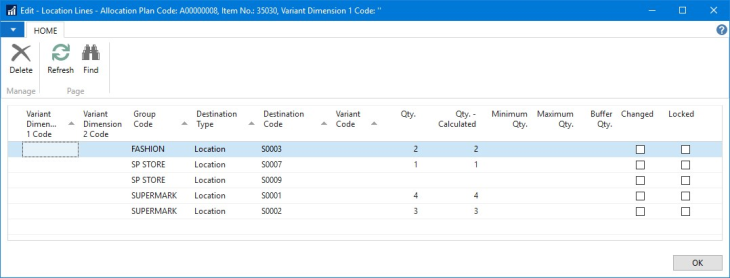
Example: Location Lines without variants and Location as Destination Type.
The Location Lines page shows the locations (or customers) which are applied to the Buyer's Push Line according to the selected Allocation Rule. The Location Lines represent the most detailed level in the distribution calculation and can be seen as the result on the lowest level. By default, the Variant Dimension Codes 1 and 2 are shown, but all six Dimension Codes are stored in the Location Lines.
You can change the Qty. field, if you want to use a different distribution share. If you change the quantity, the system will place a check mark in the Changed column. To preserve changes from top-down recalculations, you must select the Locked check box.
You can change the Buffer Qty. field, if you want to use a different ratio between distributed quantity and quantity kept in the warehouse.
See Also